Cheap Yagis
I, like many hams, am always in search of antennas that work perfectly and cost next to nothing. As more and more people turn to commercial equipment, finding simple inexpensive stuff can be a real challenge but I believe that I've found the perfect solution. These antennas, designed by Kent Britain, WA5VJB, cost pennies to make and work very well. They can be made in a very short time, they occupy very little space, they are light, the design is easily reproducible, they are almost foolproof, they work.
First let me say that I prefer metal boom antennas for their inherent simplicity and lightening safety but I have made an exception by including these antennas on my pages, because they really are a temporary antenna and they sure are easy to build.
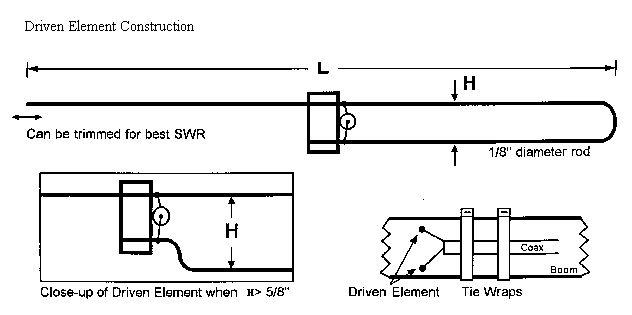
Some people refer to this antenna as self-matching. The secret is the driven element. Keep it simple - there is no special matching system, no special engineering or milling required, no difficult connections, and there are no adjustments. The bottom of the driven, the short part of the J, is 1/2 the length L + 1/2 the thickness of the boom. If you are using 3/4" boom and the J spacing (dimension H) is greater than 5/8", then shape the driven for the last 1" or 1.5" so that both the long section, and the end of the short part of the J will pass through the boom, securely. This is not critical. Solder the 50 ohm coax feedline to the driven element and seal the coax with goop to keep the moisture out.
Here are the measurements for several main vhf and uhf bands. There is very little to say about construction. Measure carefully, drill the insulated boom carefully, insert the element, centre it, and hold it in place with some glue. 1/8" aluminum or copper rod fit snuggly into a hole drilled with a 1/8" drill bit. I like white PVC for the boom, but gray should work ok, or wood or fiberglass. I suggest 3/4" or larger diameter booms. These antennas, particularly 432MHz and up, can be end mounted, because they are small and light. You can centre mount the larger antennas. You can make up a 2 clamp or 1 clamp antenna mount (1 clamp works fine).
In the following chart:
| Frequency | 144 | 222 | 432 | 902 | ||||
|---|---|---|---|---|---|---|---|---|
| L | From Refl | L | From Refl | L | From Refl | L | From Refl | |
| Reflector | 42.00 | 0.00 | 26.25 | 0.00 | 13.5 | 0.00 | 6.20 | 0.00 |
| Driven | 38.50 | 8.50 | 24.50 | 5.00 | 13.00 | 2.50 | 5.70 | 2.40 |
| D1 | 37.50 | 19.25 | 24.10 | 10.75 | 12.50 | 5.50 | 5.60 | 3.90 |
| D2 | 33.00 | 40.50 | 23.50 | 22.00 | 12.00 | 11.25 | 5.50 | 5.80 |
| D3 | 23.50 | 33.75 | 12.00 | 17.50 | 5.50 | 9.00 | ||
| D4 | 21.00 | 45.50 | 11.00 | 24.00 | 5.40 | 12.40 | ||
| D5 | 12.00 | 30.75 | 5.30 | 17.40 | ||||
| D6 | 11.25 | 38.00 | 5.20 | 22.40 | ||||
| Driven H | 1.00 | 1.00 | .625 | .50 | ||||
| Gain | 9dBi | 11dBi | 12.6dBi | 13.5dBi | ||||
| F to B | 30dB | 30dB | 40dB | 25dB | ||||
| Notes: | ||||||||
For additional details visit the main Cheap Yagi web site at http://www.wa5vjb.com/references.html
By the way, if you are a perfectionist and want all the elements to line up nicely, here is my secret. I made a holder for the PVC conduit out of some scraps of wood. The base is 3/4" plywood about 4 feet long and 2.5" wide. I cut 2 more strips of the 3/4" plywood, about 1" wide and 4 feet long. I fastened 1 strip, on edge, to the surface of the base, using some 1.5" wood screws. I pre-drilled the holes so that everything went together easily. Then, using a scrap piece of conduit as a spacer, I fastened the other strip to the the base so that the PVC was snug in there. The result was a U-channel into which the PVC fits snuggly and with a little pressure, ends up securely jammed in the channel. Now you can mark the PVC for the elements. I happened to have an inexpensive table mounted drill press. I clamped a piece of wood to act as a guide to maintain the proper and consistent distance from the back of the drill press table. Now I just slide the wood holder (with PVC jammed in there) along my drill press table and drill the holes. I knocked off 6 booms in about as many minutes. If you don't have a drill press, don't worry just use your hand held power drill and try to get each hole centered and straight up and down - it will be close enough.
How to Leave This Web Page
Click here
 To go to Antenna Index Page
Click here
To go to VE3CVG Home Page
Click here
To go to my Infernal Tower page
 ve3cvg@rac.ca